
Description
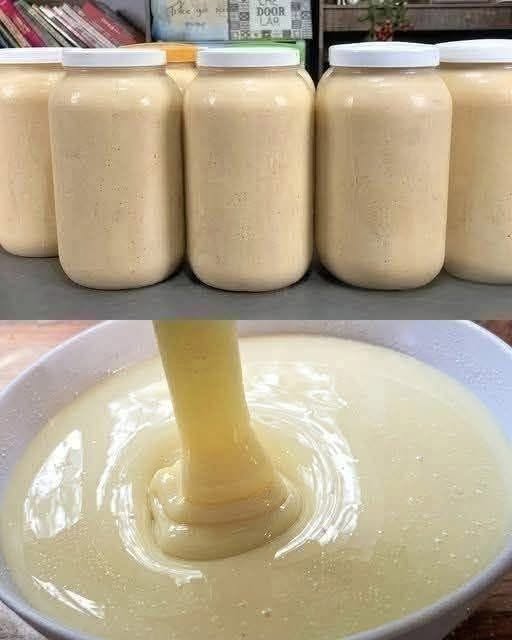
Homemade sweetened condensed milk is rich, creamy, smooth, and wonderfully sweet. Made with simple kitchen ingredients, this easy recipe transforms ordinary milk and sugar into a thick, luscious mixture perfect for desserts, drinks, and baking.
Whether you’re preparing fudge, homemade ice cream, caramel desserts, cakes, or a creamy cup of coffee, this homemade version is a practical alternative to store-bought condensed milk. It requires a little patience while the milk reduces, but the result is a silky, sweet mixture with a delicious milky flavor.
Can Homemade Sweetened Condensed Milk Support Weight Loss Goals?
Traditional sweetened condensed milk is high in calories and added sugar, so it is best enjoyed in moderate portions when working toward weight-management goals.
-
Measure your portions: A tablespoon can add sweetness and creaminess without requiring a large amount.
-
Use it strategically: A little can sweeten coffee, yogurt-based desserts, or homemade treats.
-
Be mindful of sugar: The recipe contains added sugar, which contributes to its calorie and carbohydrate content.
-
Enjoy balanced meals: Pair desserts made with condensed milk with an overall balanced eating pattern.
Homemade preparation gives you control over the ingredients, but it does not automatically make condensed milk low-calorie or low-sugar.
Does Homemade Sweetened Condensed Milk Fit a High-Protein Lifestyle?
Milk provides protein, calcium, and other nutrients, making this recipe a source of some dairy protein. However, the added sugar increases the calorie and carbohydrate content, so traditional sweetened condensed milk is better treated as a dessert ingredient than a primary protein source.
Its net carbohydrates are relatively high because milk contains lactose and the recipe includes added sugar. For a high-protein lifestyle, use small amounts alongside protein-rich foods or choose an unsweetened, higher-protein alternative when appropriate.
My Personal Experience
-
A wonderfully creamy texture: Slowly reducing the milk creates a thick consistency that blends beautifully into desserts. Stirring regularly helps keep the mixture smooth.
-
Fresh, milky flavor: Making it at home gives the condensed milk a rich dairy taste that works well in homemade sweets and beverages.
-
Easy to customize: You can add vanilla for a dessert-like aroma or a tiny pinch of salt to balance the sweetness.
-
Useful for many recipes: This homemade ingredient works well for fudge, milkshakes, ice cream, and creamy tea or coffee.
Perfect For
-
Homemade desserts and sweet treats
-
Cakes, cookies, and dessert bars
-
Homemade ice cream and kulfi
-
Fudge and truffles
-
Sweet coffee, tea, and milkshakes
-
Baking recipes that call for condensed milk
-
Homemade pantry staples
Why You’ll Love This Recipe
-
Simple ingredients: Milk, sugar, and optional butter or vanilla are all you need for a classic homemade version.
-
No special equipment: A saucepan, whisk, and spoon are enough to make a smooth, rich mixture.
-
Adjustable flavor: Vanilla adds warmth, while a small pinch of salt balances the sweetness.
-
Versatile dessert ingredient: Use it in recipes that call for canned sweetened condensed milk, allowing for small differences in consistency.
-
Freshly made: You control the ingredients and can prepare just the amount you need.
-
Smooth and creamy: Gentle heating and frequent stirring help produce the signature thick texture.
Common Mistakes to Avoid
-
Using high heat: Rapid boiling can scorch the milk and create an unpleasant cooked flavor. Keep it at a gentle simmer.
-
Stirring too infrequently: Milk and sugar can stick to the bottom of the pan. Stir often, especially as the mixture thickens.
-
Reducing it too much: The mixture becomes thicker as it cools, so stop cooking while it is still pourable.
-
Adding sugar too late: Dissolve the sugar early in the process to help create a consistent texture.
-
Storing it while still hot in a sealed jar: Let it cool briefly, transfer it to a clean container, and refrigerate promptly.
Required Equipment
-
Heavy-bottomed saucepan: Distributes heat more evenly and helps prevent scorching.
-
Whisk: Helps dissolve sugar and keep the mixture smooth.
-
Silicone spatula or wooden spoon: Reaches the bottom and corners of the pan during stirring.
-
Measuring cups and spoons: Keep ingredient quantities consistent.
-
Clean glass jar with lid: Makes refrigeration and portioning convenient.
Storage Instructions
-
Refrigerator: Store in a clean, airtight container and use within about 5–7 days.
-
Cooling: Cool briefly, then refrigerate promptly. Do not leave the mixture at room temperature for more than 2 hours.
-
Freezer: Freeze in a freezer-safe container in small portions for up to about 2 months for best quality. Thaw in the refrigerator and stir well before using.
-
Texture after chilling: The condensed milk will become thicker in the refrigerator. Stir it or gently warm a small portion if needed.
-
Signs of spoilage: Discard it if you notice mold, an unusual smell, bubbling, or an unexpected change in texture. Do not taste it to test safety.
Recipe Details
-
Prep time: 5 minutes
-
Cook time: 35–50 minutes
-
Total time: 40–55 minutes
-
Yield: About 1 cup
-
Difficulty: Easy
-
Best season: Year-round
Short Recipe Description
This homemade sweetened condensed milk is made by gently simmering whole milk and sugar until the mixture becomes rich, thick, and creamy. It is an easy, versatile ingredient for baking, desserts, drinks, and homemade ice cream. A touch of vanilla is optional but adds lovely flavor.
Ingredients
-
4 cups (960 ml) whole milk
-
¾ cup (150 g) granulated white sugar
-
1 tablespoon unsalted butter (optional, for extra richness)
-
½ teaspoon vanilla extract (optional)
-
A tiny pinch of salt (optional)
Step-by-Step Instructions
Step 1: Combine the milk and sugar
Pour the whole milk into a heavy-bottomed saucepan and add the sugar. Whisk gently over medium-low heat until the sugar dissolves. Avoid letting the milk boil rapidly.
Step 2: Simmer gently
Reduce the heat to low so the milk barely simmers. Cook uncovered for approximately 35–50 minutes, stirring frequently and scraping the bottom and sides to prevent scorching.
Step 3: Watch for the right consistency
As water evaporates, the milk will reduce and become creamier. Aim for approximately 1 to 1¼ cups of finished mixture, depending on the thickness you prefer. It should coat the back of a spoon but remain pourable.
Step 4: Add optional flavorings
Remove the pan from the heat. Stir in the optional butter, vanilla extract, and pinch of salt until evenly combined. The butter adds richness, while vanilla gives the condensed milk a dessert-like aroma.
Step 5: Cool and store
Let the mixture cool briefly, then transfer it to a clean container. Refrigerate promptly. It will thicken further as it cools, so do not over-reduce it while hot.
Approximate Nutrition
Estimated per tablespoon, based on the main ingredients and a yield of about 1 cup. Values vary with the final reduction and whether optional butter is included.
|
Nutrient |
Approximate amount |
|---|---|
|
Calories |
45–60 kcal |
|
Total fat |
1–2 g |
|
Saturated fat |
0.5–1 g |
|
Cholesterol |
3–5 mg |
|
Sodium |
10–20 mg |
|
Potassium |
25–40 mg |
|
Total carbohydrates |
8–10 g |
|
Fiber |
0 g |
|
Net carbohydrates |
8–10 g |
|
Sugars |
8–10 g |
|
Protein |
1–2 g |
|
Calcium |
35–50 mg |
These are estimates, not laboratory-tested values. A more concentrated final yield increases the amount of calories and nutrients per tablespoon.
Helpful Notes
-
Use whole milk: It generally creates a richer, creamier result than low-fat milk.
-
Choose a wide saucepan: More surface area helps water evaporate more efficiently.
-
Be patient: Gentle reduction gives you better control over the texture and helps prevent scorching.
-
For a thicker result: Simmer a little longer, watching carefully as the mixture nears the desired volume.
-
For a dairy-free variation: Use a suitable full-fat canned coconut milk, understanding that the flavor and consistency will differ.
-
For recipe substitutions: Homemade condensed milk may not behave exactly like a commercial product in candy-making or baking, where precise sugar concentration matters.
-
For food safety: Keep refrigerated and make small batches rather than storing homemade condensed milk at room temperature.
Frequently Asked Questions
1. Can I make sweetened condensed milk with powdered milk?
Yes, many recipes use milk powder, water, and sugar for a faster version, although the proportions and final texture differ from the stovetop method.
2. Why is my homemade condensed milk still thin?
It may need more gentle simmering, but remember that it thickens significantly as it cools.
3. Can I use brown sugar instead of white sugar?
Yes, but brown sugar gives the condensed milk a deeper caramel-like flavor and a slightly darker color.
4. Can I make this recipe without butter?
Yes, butter is optional; the milk and sugar alone make a classic sweetened condensed milk.
5. How long does homemade condensed milk last?
Keep it in an airtight container in the refrigerator and use it within about 5–7 days.
6. Is sweetened condensed milk the same as evaporated milk?
No. Evaporated milk is concentrated milk without added sugar, while sweetened condensed milk contains added sugar and is noticeably sweeter and thicker.