
Description
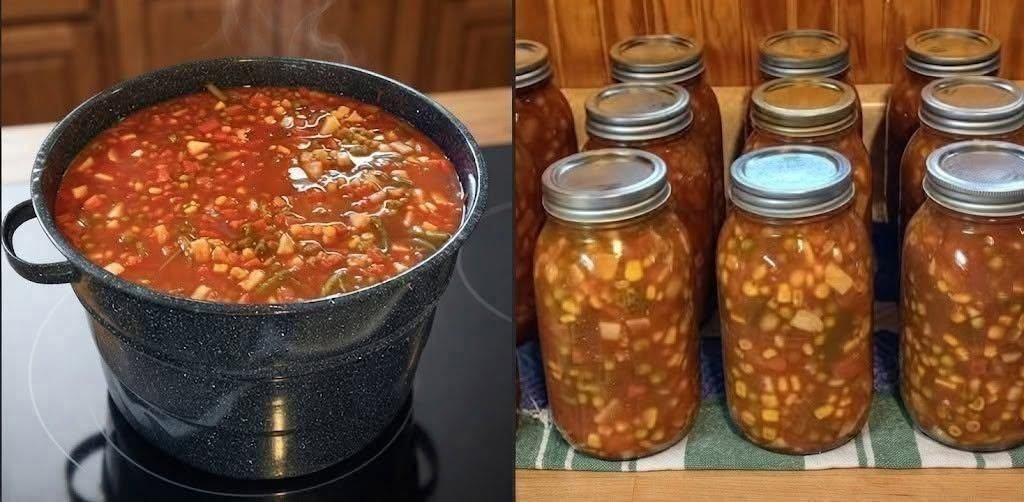
Homemade vegetable soup is a comforting combination of colorful vegetables, savory broth, and simple seasonings. Canning soup can make meal preparation easier, giving you a convenient homemade meal to enjoy on busy days.
This vegetable soup combines tomatoes, carrots, celery, corn, onions, and bell peppers for a hearty, garden-inspired flavor. When prepared using a tested pressure-canning process, it can become a useful pantry staple for quick lunches and simple dinners.
Important food-safety note: Vegetable soup contains low-acid ingredients and must be processed using a tested pressure-canning method. Do not use a boiling-water bath or an ordinary pressure cooker for shelf-stable storage.
Can Canning Vegetable Soup Support Weight Loss Goals?
Homemade vegetable soup can fit into a balanced weight-management eating plan because it offers vegetables, flavor, and convenient portioning.
-
Vegetable variety: Carrots, tomatoes, celery, and green beans provide different nutrients and some fiber.
-
Portion control: A measured serving makes meal planning easier.
-
Control over ingredients: You can manage the amount of salt and avoid unnecessary added fats.
-
Balanced meals: Add protein-rich foods when serving to make the meal more satisfying.
The nutritional value depends on the ingredients and serving size. Vegetable soup can support balanced eating, but it does not independently cause weight loss.
Does Canning Vegetable Soup Fit a High-Protein Lifestyle?
Vegetable soup is not particularly high in protein by itself, but it pairs well with protein-rich foods. Chicken, eggs, tofu, or other suitable protein sources can be added after opening and reheating the soup.
The carbohydrates mainly come from vegetables such as corn, carrots, and tomatoes. For a lower-carbohydrate serving, choose an appropriate portion and consider adding protein when serving. Always follow the tested canning recipe rather than changing ingredient quantities to meet dietary goals.
My Personal Experience
-
Convenient homemade meals: Properly pressure-canned soup provides a practical meal base for busy days. Heat the contents thoroughly after opening and adjust the seasoning if needed.
-
Fresh vegetable flavor: A mixture of colorful vegetables creates a savory, comforting soup that works well with herbs.
-
Easy to customize: Add fresh herbs, cooked pasta, rice, or cream after opening rather than placing these ingredients in the jars before canning.
-
Helpful for meal preparation: Preparing several jars can simplify future lunches and dinners when the correct preservation method is followed.
Perfect For
-
Homemade pantry meal preparation
-
Quick lunches and easy dinners
-
Preserving seasonal vegetables
-
Family meal planning
-
High-protein meals when paired with protein-rich foods
-
Cozy winter meals
-
Using garden vegetables
-
Convenient homemade comfort food
Why You’ll Love This Recipe
-
Simple vegetable ingredients: A combination of tomatoes, carrots, celery, corn, onions, and peppers creates a satisfying flavor.
-
Convenient meal prep: Prepare jars using an approved pressure-canning procedure for future meals.
-
Flexible serving options: Add noodles, rice, herbs, or cooked protein after opening.
-
Homemade taste: Simple seasonings allow the natural vegetable flavors to shine.
-
Great for seasonal produce: This recipe offers a practical way to use fresh vegetables.
-
Easy to portion: Individual jars make it convenient to plan meals.
Common Mistakes to Avoid
-
Using a boiling-water bath: Low-acid vegetable soup requires pressure canning with a tested process.
-
Changing ingredient proportions: Do not freely change the quantities or types of vegetables in a tested canning recipe.
-
Adding thickeners: Flour, cornstarch, cream, milk, pasta, and rice should not be added before canning.
-
Guessing the pressure or processing time: Follow the tested instructions for jar size, canner type, and elevation.
-
Using unsuitable equipment: An ordinary pressure cooker is not automatically suitable for safe home canning.
Required Equipment
-
Pressure canner: Provides the processing conditions needed for safely preserving low-acid soup.
-
Approved canning jars: Use jars intended for home canning and inspect them for damage.
-
Canning lids and bands: Help create a proper seal when used according to instructions.
-
Jar lifter: Makes it easier to handle hot jars safely.
-
Canning funnel: Helps transfer soup into jars without spilling.
-
Bubble remover and headspace tool: Help remove trapped air and measure the correct space below the rim.
-
Large stockpot: Used to prepare and heat the soup before filling jars.
-
Ladle and slotted spoon: Help distribute vegetables and liquid evenly.
-
Timer: Tracks the required processing time.
-
Permanent marker: Labels jars with the contents and preparation date.
Storage Instructions
-
Sealed jars: Store in a cool, dry, dark place only after processing with a tested pressure-canning procedure and confirming the seals.
-
Opened jars: Refrigerate promptly and use within 3–4 days.
-
Unsealed jars: Refrigerate for prompt use or freeze in a suitable container.
-
Freezing: If you do not have proper pressure-canning equipment, freeze the soup instead of attempting shelf-stable canning.
-
Spoilage warning: Never taste food from a jar with a bulging lid, leakage, spurting liquid, mold, or other suspicious signs.
Recipe Details
-
Prep time: 45–60 minutes
-
Cooking time before filling: Approximately 5 minutes at a boil after combining the prepared ingredients
-
Pressure-processing time: 60 minutes for pint jars or 75 minutes for quart jars under the general tested soup procedure
-
Total time: Several hours, including preparation, pressure buildup, processing, and cooling
-
Yield: Approximately 9 pint jars for the specific vegetable combination below
-
Difficulty: Intermediate
-
Best season: Summer through fall
Processing pressure must be adjusted for elevation and pressure-canner type. Use a tested recipe for your exact ingredients and follow its instructions precisely.
Short Recipe Description
This homemade vegetable soup combines tomatoes, carrots, celery, corn, onions, and bell peppers in a savory broth. It is a convenient soup base for quick meals and can be preserved using a tested pressure-canning method. Add pasta, rice, cream, or extra protein after opening and reheating.
Ingredients
The following ingredients are based on a tomato vegetable soup formulation. For canning, use the exact quantities and preparation directions from a tested recipe.
-
6 cups peeled, chopped tomatoes
-
1 cup chopped onion
-
2 cups sliced carrots
-
2 cups chopped celery
-
2 cups corn kernels
-
2 cups chopped bell pepper
-
5 cups tomato juice
-
3 cups water
-
1 teaspoon salt
-
1 teaspoon black pepper
Important: Do not freely substitute vegetables or change the proportions for canning. Use a validated recipe that specifically covers your ingredient combination and jar sizes.
Step-by-Step Instructions
Step 1: Prepare the equipment
Read the pressure canner manufacturer’s instructions and the tested soup-canning directions before starting. Inspect jars for chips or cracks, wash them, and keep them hot until filling. Prepare lids according to the manufacturer’s directions.
Step 2: Prepare the vegetables
Wash all vegetables thoroughly. Peel the tomatoes by placing them briefly in boiling water until their skins split, then transfer them to cold water. Remove the skins and firm cores before chopping.
Peel and slice the carrots, chop the celery, onion, and bell peppers, and prepare the corn according to the tested recipe.
Step 3: Combine and heat the soup
Place the measured vegetables, tomato juice, water, salt, and pepper in a large stockpot. Bring the mixture to a boil, then simmer for approximately 5 minutes as directed by the tested recipe.
Do not puree or thicken the soup before canning.
Step 4: Fill the jars
Use a slotted spoon to fill each hot jar halfway with the solid vegetables. Add enough hot liquid to cover the vegetables, leaving 1 inch of headspace.
Remove trapped air bubbles with an appropriate canning tool, recheck the headspace, wipe the jar rims clean, and apply the lids according to the manufacturer’s instructions.
Step 5: Process in a pressure canner
Place the jars in a pressure canner fitted with its rack. Follow the manufacturer’s instructions for venting, bringing the canner to pressure, and maintaining the required pressure.
Under the general tested soup procedure, pint jars are processed for 60 minutes and quart jars for 75 minutes. The required pressure depends on the canner type and elevation. Begin timing only when the canner reaches the specified pressure.
Step 6: Allow the canner to cool naturally
When processing is complete, turn off the heat and let the canner depressurize naturally. Never force it open or cool it rapidly. Follow the manufacturer’s instructions before removing the lid.
Step 7: Cool and check the seals
Remove jars carefully using a jar lifter and place them upright on a towel or rack away from drafts. Leave them undisturbed for 12–24 hours, then check the seals and label the jars.
If a jar does not seal, refrigerate it for prompt use or freeze the contents in a suitable freezer container.
Approximate Nutrition
Estimated per 1-cup serving. Actual values depend on the ingredients, serving size, and amount of broth consumed.
|
Nutrient |
Approximate amount |
|---|---|
|
Calories |
60–90 kcal |
|
Total fat |
1 g |
|
Cholesterol |
0 mg |
|
Sodium |
150–350 mg |
|
Potassium |
350–550 mg |
|
Total carbohydrates |
12–18 g |
|
Fiber |
3–5 g |
|
Net carbohydrates |
8–14 g |
|
Sugars |
5–8 g |
|
Protein |
2–4 g |
|
Calcium |
30–60 mg |
These values are estimates rather than laboratory-tested nutrition data. They are provided for general nutrition information, not to determine whether a canning process is safe.
Helpful Notes
-
Pressure canning is essential: Low-acid vegetable soup must not be processed in a boiling-water bath.
-
Maintain the required headspace: Follow the tested instructions for filling jars and removing air bubbles.
-
Avoid thickening ingredients: Add noodles, rice, flour, dairy, and other thickeners only after opening the jar.
-
Do not rely on the seal alone: A sealed lid does not prove that food was processed safely.
-
Adjust for elevation: Use the pressure setting specified for your elevation and canner type.
-
If you do not own a pressure canner: Refrigerate the soup for short-term use or freeze it.
-
For serving: Reheat the soup thoroughly and add fresh herbs or cooked protein as desired.
Frequently Asked Questions
1. Can I can vegetable soup in a boiling-water bath?
No, vegetable soup requires pressure canning with a tested process because it contains low-acid ingredients.
2. Can I add pasta or rice before canning?
No, add pasta or rice after opening the jar and reheating the soup.
3. How long should I pressure-can vegetable soup?
The general tested soup procedure specifies 60 minutes for pint jars and 75 minutes for quart jars, with the required pressure adjusted for elevation and canner type.
4. Can I use any vegetables I have available?
No, use vegetables covered by a tested canning recipe and follow its ingredient quantities and preparation instructions.
5. Can I use an ordinary pressure cooker?
Do not assume an ordinary pressure cooker is suitable; use a pressure canner designed for validated home-canning procedures.
6. What if I do not own a pressure canner?
Freeze the soup in suitable containers or refrigerate it for short-term use instead of attempting shelf-stable canning.